Meyer Lemon-Cranberry Bundt Cake

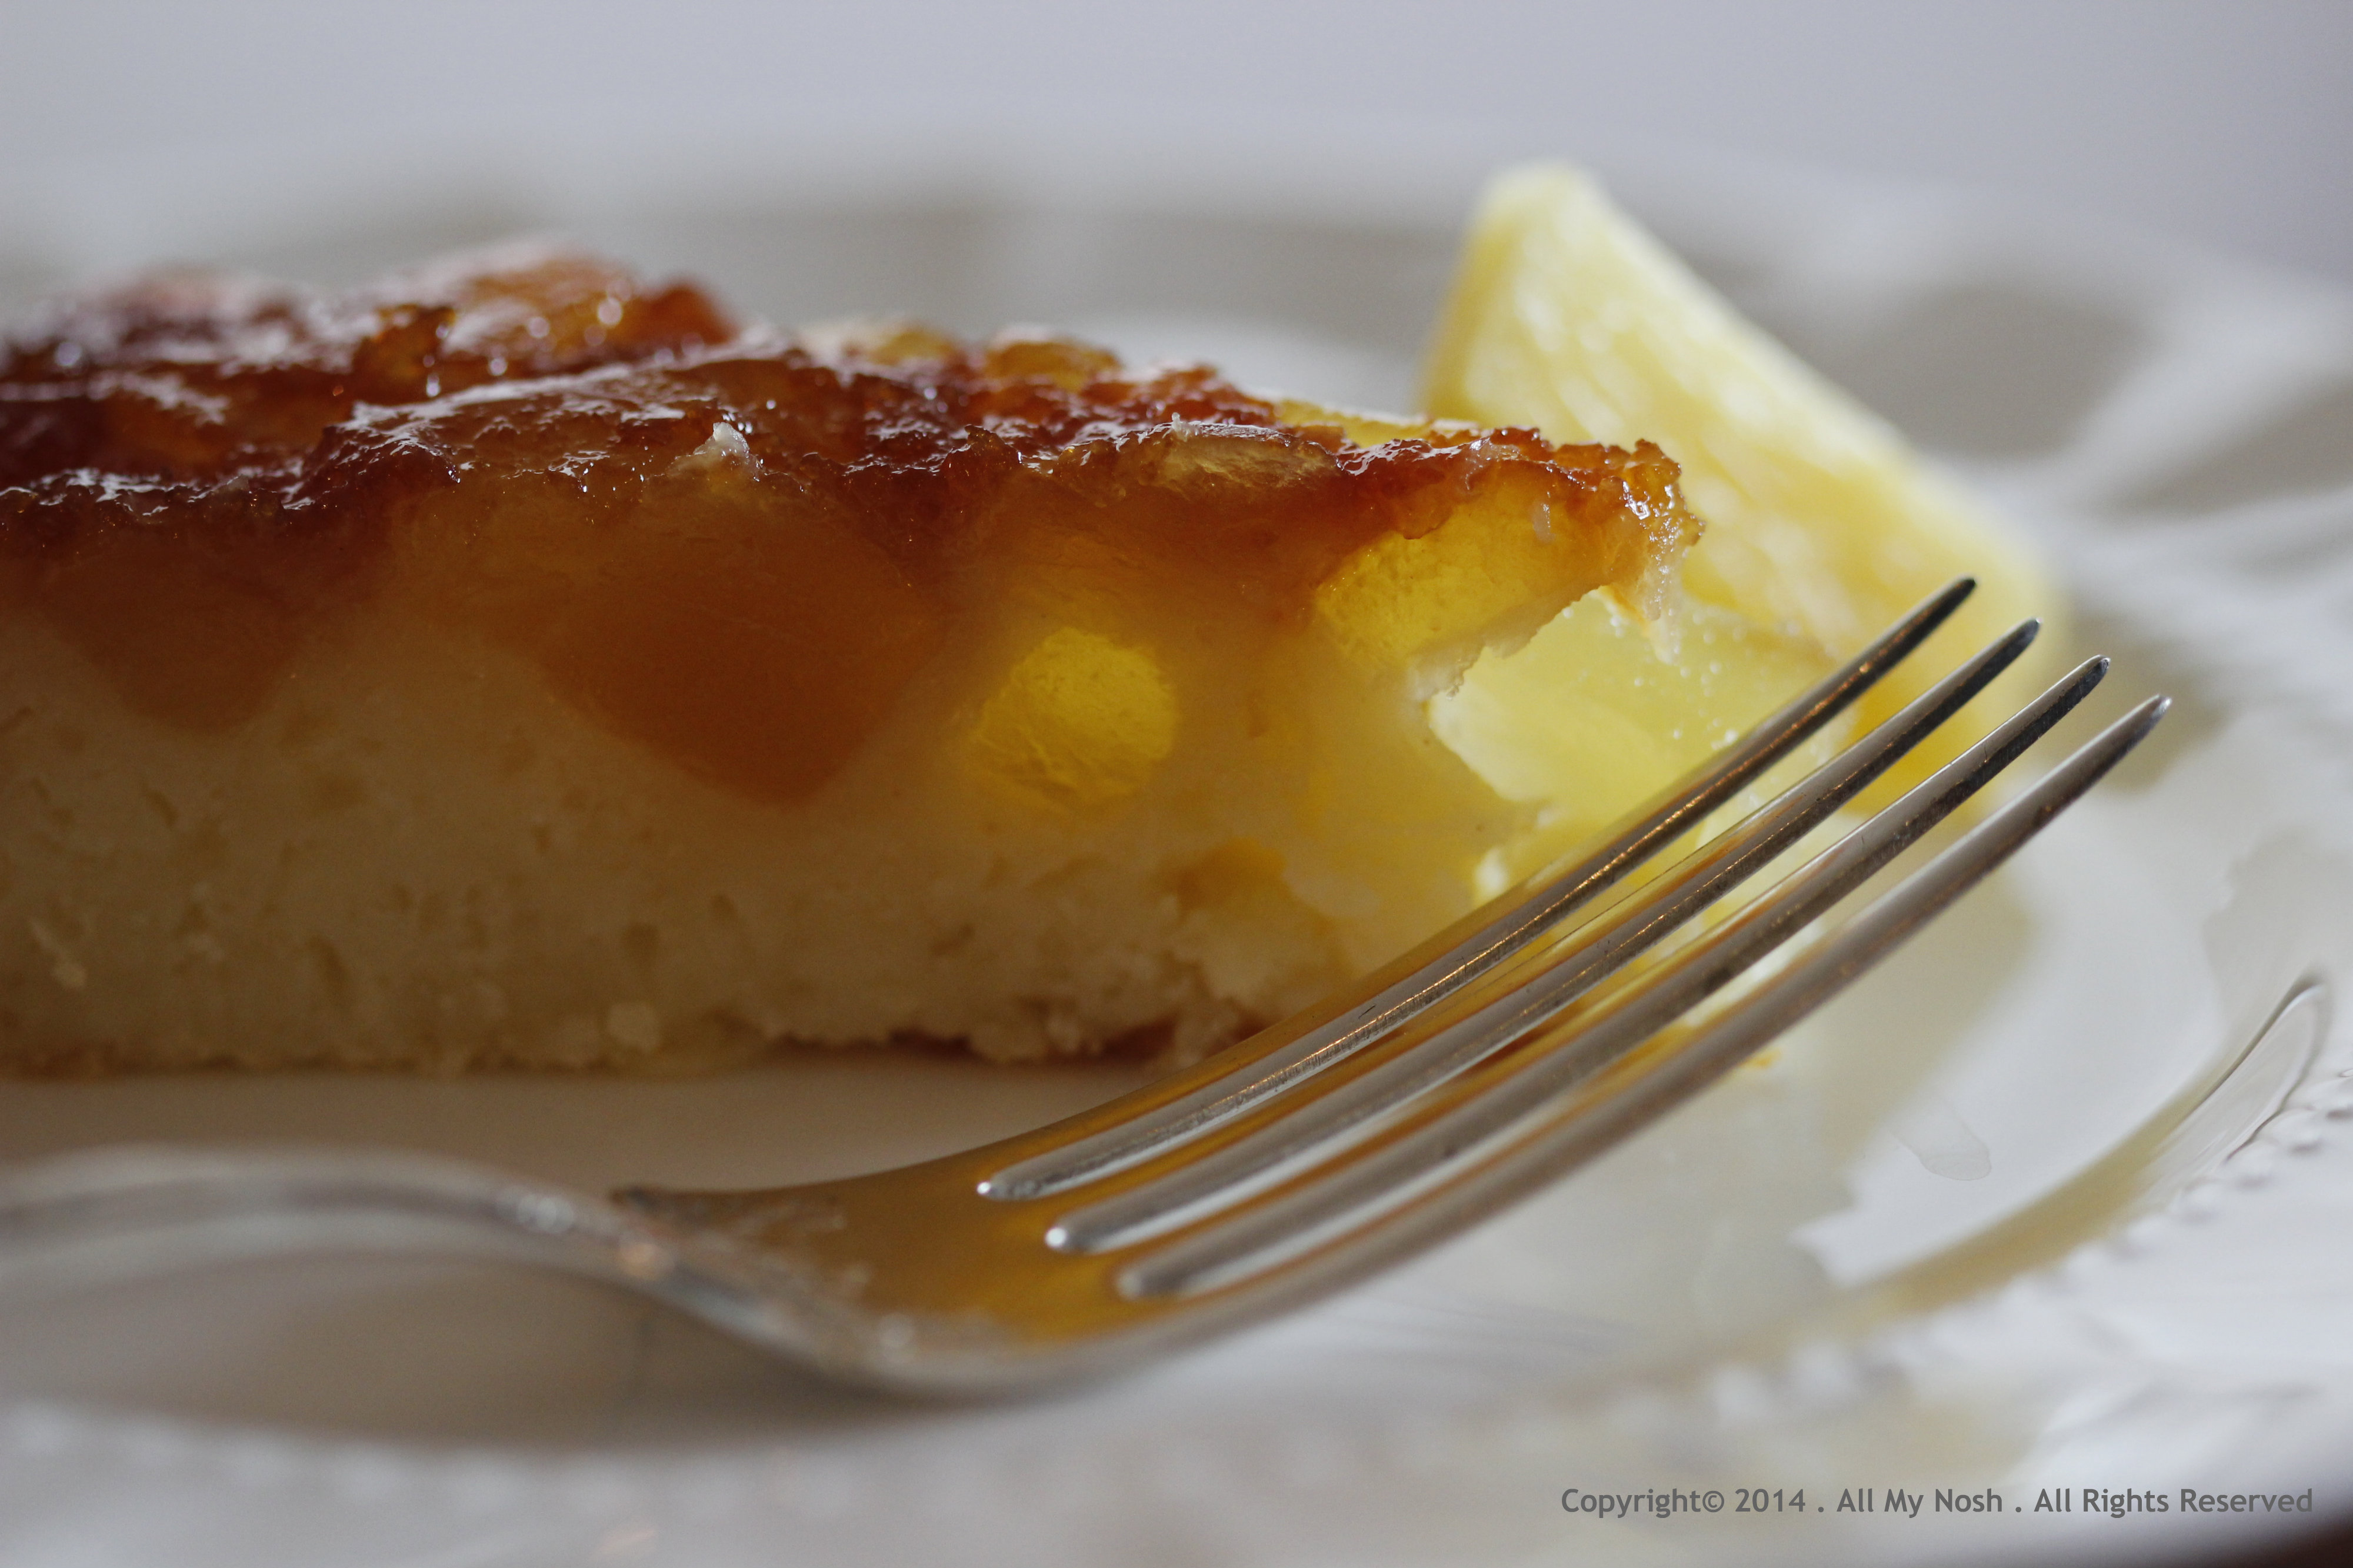
Tangy cranberries and fragrant and bold Meyer lemons add refreshing qualities to this moist cake. Meyer lemon fruits have a sweeter, less acidic flavour than the more common supermarket lemon varieties. As the cake bakes, the cranberries are transformed into a sweet-tart compote-like texture. Ideal for brunch or afternoon coffee or tea.

Lemon Cranberry Bundt Cake_AMN

Ingredients:

12 Tbs (1 1/2 sticks) unsalted butter (at room temperature) plus some for greasing the pan(s)
2 cups fresh (or frozen) cranberries
2 1/2 cups all-purpose flour
2 1/2 tsp. baking powder
1/2 tsp. baking soda
1 tsp. salt
1 1/2 cups granulated sugar
2 Meyer lemons
3/4 cup buttermilk
1 tsp. pure vanilla extract
3 eggs
Confectioner’s sugar, for dusting

Directions:

Preheat an oven to 350°F. Grease a 12-cup Bundt pan or 12 mini Bundt pans with butter.

In a bowl, whisk together the flour, baking powder, baking soda and salt. Add the granulated sugar to the bowl of a stand mixer. Finely grate the zest from the Meyer lemons over the sugar and mix briefly.

Squeeze the juice from the Meyer lemons. In a cup, combine 4 Tbs. of the lemon juice, the buttermilk and vanilla.

Add the butter to the lemon zest–sugar mixture and beat on medium-high speed until light and fluffy, for about 1 to 2 minutes. Beat in the eggs one at a time, scraping the sides of the bowl after each addition. Reduce the mixer speed to low and add the dry ingredients in 3 batches, alternating with the buttermilk mixture in 2 batches. Scrape down the sides of the bowl and beat again, raise the mixer speed to medium-high and beat for 1 minute to aerate the batter. Fold in cranberries.

Scrape the batter into the prepared Bundt pan or mini Bundt pans. Spread the batter and smooth the top. Bake until the cake tester inserted into the center comes out clean, 35 to 40 minutes (Note: if mini Bundt pans are used, 20-25 minutes). Let cool in the pan(s) for 5 minutes, then invert the cake(s) onto a wire rack and let cool completely.

Once the cake is cool, dust with confectioner’s sugar just before serving.

This cake can easily serve 12 people.

Note: The recipes on this site are my original creations or have been adapted from existing recipes with the original sources attributed. All recipes on this site have been tested at least once in my kitchen. Any and all errors are entirely mine.

Copyright© 2014 . All My Nosh . All Rights Reserved

Amaretti Flan (Bônet Alla Piemontese)

Amaretti flan (also known as Bônet) is a typical dessert of Piedmont made with amaretti and ladyfingers (savoiardi) with milk, cocoa, eggs and sugar. There are a lot of variants of this recipe. For example the addition of coffee, nuts or grated orange peel. This recipe uses amaretti cookies and coffee liquor. Whatever variant you choose, this is easy to make dessert and tastes great.

Amaretti Flan

Ingredients:

Flan
2 cups whole milk
5 oz granulated sugar
5 oz amaretti cookies
1 ¼ oz cocoa powder
4 eggs
4 Tbs. coffee liquor

For caramel
3 oz water
1/2 lb granulated sugar
1 Tbs. corn syrup

Direction:

Preheat an oven to 325°F. Have a pot of boiling water ready.

In a heavy saucepan, preferably copper, over medium-high heat, combine the sugar, water and corn syrup and bring to a boil, stirring only a few times, until the syrup is clear. Reduce the heat to medium and simmer, without stirring, until the syrup begins to darken – the syrup starts to color. This will take about 5 to 10 minutes. The caramelizing process is quick, and the syrup can burn easily.

Immediately pour the caramel into a 9-by-2-inch round cake pan, and distribute the caramel evenly over the bottom. Set aside the cake pan.

In a bowl beat eggs and the remaining sugar until light and fluffy. Crush the amaretti macaroons to small pieces. Mix crushed amaretti cookies and cocoa powder with eggs and sugar. Stir in milk and the coffee liquor, and pour the mixture into the caramel-coated cake pan.

Pour boiling water to a depth of 1 inch into the baking pan. Bake the prepared flan, uncovered for about 1 hour, until the flan is just set and a knife inserted near the center comes out clean.

Remove the roasting pan from the oven, remove the flan and transfer to a wire rack to cool. Leave the flan to set in a refrigerator covered with plastic wrap for at least 6 hours or up to a day.

To unmold, run a thin knife around the inside edge of the cake pan. Place a serving plate with a rim over the top and invert the plate and flan together. Lift off the cake pan carefully.

Decorate the flan with amaretti cookies before serving. Serves 8 to 10.

Adapted from: Lidia’s Italian Table by Lidia Bastianich, Harpercollins Publishers.

Note: The recipes on this site are my original creations or have been adapted from existing recipes with the original sources attributed. All recipes on this site have been tested at least once in my kitchen. Any and all errors are entirely mine.

Copyright© 2014 . All My Nosh . All Rights Reserved

Pineapple Flan

This delectably sweet flan gives you tropical island flavors without having to leave your kitchen.

Pineapple Flan

Ingredients:

1 cup sugar
36 oz pineapple chunks (fresh or canned)
½ cup pineapple juice
6 large eggs
½ cup all-purpose flour
1 teaspoon lemon zest
4 tablespoons rum

Directions:

Preheat the oven to 350 degrees F.

To make caramel, place ½ cup of the sugar and 2 tablespoons water into a pan. Place the pan over medium heat and dissolve the sugar, and boil until it turns a dark, fragrant, liquid caramel. Pour into a 9-inch cake pan and swirl to coat the bottom evenly. Set aside.

Crush three-quarters of the pineapple and mix with the pineapple juice and the remaining sugar. Cook the pineapple over medium heat for 10 minutes.

Break the eggs into a bowl and whisk in the flour, lemon zest and rum. Add the pineapple mixture.

Pour the mixture into the prepared pan, place in a roasting pan filled halfway with boiling water, and bake for 1 hour.

Remove the flan from the oven and from the water bath. Cool and store in the refrigerator. For best results, refrigerate the flan overnight in the refrigerator.

To serve, run a knife around the outside edge to loosen the flan. Flip the flan onto a serving plate and pour over any caramel remaining in the pan.

This flan can easily serve 8 people.

Note: The recipes on this site are my original creations or have been adapted from existing recipes with the original sources attributed. All recipes on this site have been tested at least once in my kitchen. Any and all errors are entirely mine.

Copyright© 2014 . All My Nosh . All Rights Reserved

Flourless Chocolate Chip Cookies

“My therapist told me the way to achieve true inner peace is to finish what I start. So far today, I have finished 2 bags of M&M’s and a chocolate cake. I feel better already.”
– Dave Barry

“Coraline opened the box of chocolates. The dog looked at them longingly.
“Would you like one?” she asked the little dog.
“Yes, please,” whispered the dog. “Only not toffee ones. They make me drool.”
“I thought chocolates weren’t very good for dogs,” she said, remembering something Miss Forcible had once told her.
“Maybe where you come from,” whispered the little dog. “Here, it’s all we eat.”
– Neil Gaiman, Coraline

COOKIES!!! UMM-NUM-NUM-NUM-NUM!!!
– Cookie Monster
Flourless Chocolate Cookie

Ingredients

3 ½ cups powdered sugar
1 cup unsweetened Dutch-process cocoa powder
¼ teaspoon salt
3 large egg whites, at room temperature
1 Tablespoon pure vanilla extract
1 ½ cups bittersweet chocolate chips

Directions

Preheat oven to 350 degrees F (175 degrees C). Line two baking sheets with parchment paper (or baking mats). If you use parchment paper, lightly grease the parchment paper with nonstick spray.

In a large bowl, whisk together powdered sugar with cocoa powder and salt. Whisk in two egg whites and vanilla extract and beat just until the batter is moistened. You should have brownie-like, thick and fudgy batter consistency. If it seems too thick, add the third egg white. Gently stir in chocolate chips.

Spoon the batter onto the prepared baking sheets in 12 evenly spaced mounds per cookie sheet. You can use a spring-release cookie scoop. Bake about 15 minutes, until the tops are glossy and lightly cracked.

Transfer the baking sheets to wire racks and let the cookies cool on the sheets for 15 minutes, then transfer the cookies to the racks and let cool completely. You can store these cookies in an airtight container for up to 5 days.

Makes about 12 cookies.

Note: The recipes on this site are my original creations or have been adapted from existing recipes with the original sources attributed. All recipes on this site have been tested at least once in my kitchen. Any and all errors are entirely mine.

Copyright© 2013 . All My Nosh . All Rights Reserved

Tiramisu Cake

Tiramisù, literally “pick-me-up,” is a classic coffee flavored Italian dessert made of ladyfingers. According to The Washington Post Carminantonio Iannaccone created tiramisu in 1969 when he was head chef at Via Sottotreviso in Treviso, near Venice. Countless variations for Tiramisu exist and this recipe uses cake, in place of ladyfingers. This version is an elegant round cake made from layers of delicate espresso-infused cake and filling made from sweetened mascarpone and whipped cream.

Tiramisu Cake

Ingredients:

Cake
8 tablespoons (1 stick) butter, room temperature
1 cup sugar
3 large eggs
1 large egg yolk
2 teaspoons pure vanilla extract
2 cups cake flour
2 teaspoons baking powder
1/8 teaspoon baking soda
1/4 teaspoon salt
3/4 cup whipping cream

Espresso Syrup
2 tablespoons Espresso powder
1/4 cup water
4 tablespoon Kahlua

Filling
1 cup whipping cream
8 ounces mascarpone cheese
1/2 cup confectioners’ sugar
2 teaspoons pure vanilla extract

Garnish
8 ounces semi-sweet chocolate block for shavings
About 20 ladyfingers

Directions:

Preheat oven to 350 degrees F (175 degrees C). Lightly grease 3 8-inch round cake pans.

In a large mixing bowl, cream together the butter and sugar. Add the eggs and egg yolk one at a time, beating well after each addition. Mix in the vanilla extract. Gradually add the cake flour, baking powder, baking soda, and salt. Mix in the whipping cream.

Divide batter evenly between baking pans and bake for about 30-40 minutes, or until a toothpick inserted in the center comes out clean and the cakes spring back when touched.

Allow to cool in pans for 10 minutes before removing and transferring to a cooling rack to cool completely.

In a small bowl, whisk together espresso powder and hot water. Set aside.

In a large bowl, whip cream until it forms stiff peaks. In another bowl, whisk together mascarpone, confectioners’ sugar and vanilla. Fold the whipped cream into the mascarpone mixture.

To assemble the cake:

If the top of the cakes have crowned, trim off the top of the cakes to make them level using a long serrated knife. Place one cake layer on a cake plate. Using a pastry brush, soak the top of the cake in 1/3 of the espresso syrup. Spread the top with 1/3 of the mascarpone filling.

Place the second layer over the mascarpone filling. Using a pastry brush soak the top the second cake layer with another 1/3 of the espresso syrup. Spread the top with 1/3 of the mascarpone filling.

Place the third layer over the mascarpone filling. Soak the top of the cake with the remaining espresso syrup. Spread the remaining mascarpone frosting over the top and sides of the cake.

To make the chocolate curls, use a vegetable peeler and run it down the edge of the chocolate block. Spread the top of the cake with chocolate curls until the mascarpone frosting is no longer visible.

Press ladyfingers onto the mascarpone frosting on the outside of the cake, spacing them evenly apart.

Chill in the refrigerator until ready to serve. For best results, make the cake one day prior to serving so the flavors have enough time to properly blend.

This cake can easily serve 8-10 people.

Note: The recipes on this site are my original creations or have been adapted from existing recipes with the original sources attributed. All recipes on this site have been tested at least once in my kitchen. Any and all errors are entirely mine.

Copyright© 2013 . All My Nosh . All Rights Reserved